![HOW TO FIX FORWARD HEAD POSTURE [GUIDE]:](https://opstudiohk.com/wp-content/uploads/2020/07/forward-head-posture.jpg)
By JUNE 4, 20200
Similar to other structures in the body, the cervical spine (CS) has a significant influence on body regions located above and below its location. Not only does CS musculature produce movement of the head and neck, but it also plays a key role in postural orientation reflexes, proprioceptive systems, vestibular function, and facilitating stabilization of the entire body.
Similarly, in addition to localized dysfunction in the CS, sustained forward head posture (FHP) can bring about impairments in other body regions as well.
Let’s explore this subject more in depth below and how it relates to corrective exercise as a discipline!
WHAT IS FORWARD HEAD POSTURE (FHP)?
Forward head posture (FHP) – also known as Nerd Neck – is an abnormality that can be identified by examining the position of their head with respect to the cervical spine (CS). Interestingly in FHP, not only does the head project anteriorly over the CS, but simultaneous tilting of the head in a posterior direction also occurs promoting hyperextension of the upper CS (Patwardhan et al., 2018).
The backward rotation of the head on the CS is a compensation that enables an individual with FHP to look straight ahead instead of towards the ground (Patwardhan et al., 2018). If FHP becomes chronic, it can place large stresses on the muscles and connective tissue in the CS region (Patwardhan et al., 2018).
As with other postural and movement dysfunctions throughout the body, FHP often results in movement compensations due to regional musculature becoming excessively underactive or overactive.
The muscles that tend to become underactive in individuals with FHP include the deep neck flexors, cervical erector spinae, lower trapezius, and rhomboids (Clark et al., 2014). Underactivity in these muscles contribute to the inability to maintain an upright position of the CS.
Muscles that often become overactive in those with FHP include the upper trapezius, levator scapula, scalenes, sternocleidomastoid, and suboccipitals (Clark et al., 2014). Overactivity of these muscles facilitate forward head migration, as well as in some cases, rounding of the shoulders.
NEGATIVE IMPACTS OF FORWARD HEAD POSTURE

Advanced stages of FHP can contribute to upper CS compression which significantly reduces the ability of the first cervical vertebrae (C1) to rotate around the second vertebrae (C2) as it normally would (Pop et al., 2018).
If the upper CS loses its ability to rotate, the middle and lower segments of the CS must attempt to make up for this restriction which predispose them to becoming hypermobile (having the ability to move past a normal range of movement) (Pop et al., 2018).
This can result in an increased risk for spinal instability, degeneration, and pain (Pop et al., 2018). Other conditions associated with FHP include myofascial trigger points, anterior neck tightness/pain, temporomandibular joint (TMJ) disorders, rounded shoulders, as well as its promotion of respiratory inefficiency.
MYOFASCIAL TRIGGER POINTS AND HEADACHES:
Myofascial trigger points (MTP) are painful regions within a tight band of skeletal muscle and also give rise to referred pain (pain perceived at a different location than the source) (Simons et al., 1999). FHP results in increased load bearing on the musculature in the upper CS which can reduced pain thresholds as well as predispose MTP (Hong, 2019; Patwardhan et al., 2018).
Overactive musculature and MTP’s in the upper CS can predispose and contribute to the development of cervicogenic headaches (headaches originating from the neck) (Barmherzig & Kingston, 2019). The most common areas of the head that individuals experience a cervicogenic headache are the posterior and lateral aspects (Barmherzig & Kingston, 2019).
TEMPOROMANDIBULAR JOINT (TMJ) DISORDERS:
A link also exists between FHP and TMJ function (Chaves et al., 2014; Zafar, et al., 2000). FHP contributes to the development of pain in the TMJ region by altering length-tension relationships in head and neck musculature (Chaves et al., 2014).
FHP creates excessive tension in the muscles above the hyoid bone which, in turn, places greater force demands on the muscles that close the jaw (An et al., 2015). Over time, excessive force demands on the jaw muscles can lead to the development of myofascial trigger points and TMJ pain (Fernandez-de-las-Penas et al., 2010).
ANTERIOR NECK TIGHTNESS/PAIN
 FHP also increases tension in the musculature located directly above the hyoid bone (a small bone located in the upper neck below the jaw) which can cause this bone to elevate above its normal resting position. (Zheng, et al., 2012).
This can contribute to the onset of anterior neck tightness or pain, as well as contribute to other symptoms such as difficulty swallowing food (An et al., 2015; Zheng, et al., 2012). Restoring postural alignment of the head and neck has been demonstrated to reduce myofascial symptoms by re-establishing normal hyoid bone position (Pettit & Auvenshine, 2018).
ROUNDED SHOULDERS AND UPPER BACK
Many individuals with FHP also demonstrate anterior rounding of the shoulders and upper back as well. As FHP is associated with overactivity of the upper trapezius and levator scapulae muscles.
This condition can not only contribute to rounded shoulders, but negatively impact the normal movement patterns of the humerus and scapula (a condition known as scapular dyskinesis)(Bayattork et al., 2019). Rounding of the shoulders also predisposes the development of shoulder pain and impingement (Bayattork et al., 2019).
The thoracic spine, especially the upper thoracic region, contributes to neck mobility (Tsang et al., 2013). Increased thoracic kyphosis (excessive anterior rounding of the upper back), can also promote hyperextension in the upper CS, which can lead to neck pain and stiffness (Roussouly, 2011).
Additionally, a forward-held head, rounded shoulders, and excessive TK predisposes contracture (shortening) of the pectoral muscles, which also negatively affects overhead reaching ability (Olszewska, et al., 2018).
If both FHP and rounding of the shoulders is occurring at the same time, this postural distortion is known as upper crossed syndrome (Janda, 2002).
RESPIRATORY INEFFICIENCY
Another negative influence of sustained FHP is the promotion of respiratory inefficiency. Normal inspiration (breathing in) is initiated by contraction of the primary respiratory muscles- the diaphragm and external intercostal muscles (Kenney et al., 2015). However, in individuals with FHP, muscle activity and function of the diaphragm may decrease, which can reduce lung expansion during inspiration (Okuro et al., 2011).
To make up for impaired muscle power of the diaphragm, individuals with FHP may compensate by utilizing accessory respiratory muscles such as the sternocleidomastoid (SCM) muscle to inspire air (Okuro et al., 2011). Excessive SCM activity when breathing at rest can cause an individual’s shoulders and rib cage to move up and down rather than remaining in their normal stationary position (Okuro et al., 2011). Correction of FHP has been demonstrated to improve respiratory function and efficiency (Kim, et al., 2015).
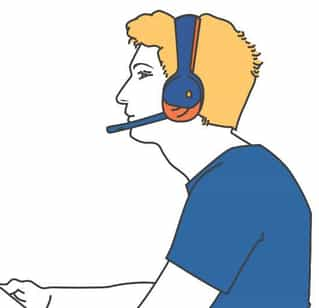
MAINTAINING POOR POSTURE DURING EXCESSIVE SCREEN-TIME
To help pass the time during the coronavirus pandemic, many individuals who have been confined at home have been engaging in excessive t.v. watching and extensive use of computers, tablets, and phones (Bowles, 2020). Individuals who maintain poor or awkward neck posture for prolonged periods of time during these activities are susceptible for neck pain and muscle strains.
For example, using a laptop computer that is placed on one’s legs results in greater neck flexion, torque and neck strain compared to using a standard computer that is located on a desk (Berkhout et al., 2004).
In addition to neck pain, if poor posture is habitually sustained during these or other daily activities, it may also lead to muscle and spinal remodeling which can eventually result in permanent FHP (Dimitriadis, 2015).
MAINTAINING POOR POSTURE DURING EXCESSIVE GAMING
 Not only are adults susceptible for FHP development, but children and adolescents are also at risk. Video game use among children and adolescents has risen substantially over the last decade.
As video game playing can facilitate intense concentration and maintenance of awkward postures, children and young adults who play video games excessively may be at higher risk of developing musculoskeletal disorders (Gillespie, 2002).
If FHP is not addressed and excessive gaming continues as they age, children will bring their skeletal malalignments into adulthood which puts them at higher risk for chronic postural abnormalities and spinal degenerative changes over their lifespan (Pop et al., 2018; Stone et al., 2015).
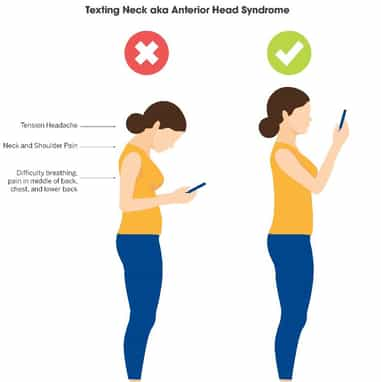
MAINTAINING POOR POSTURE WHEN TEXTING – “TEXT NECK”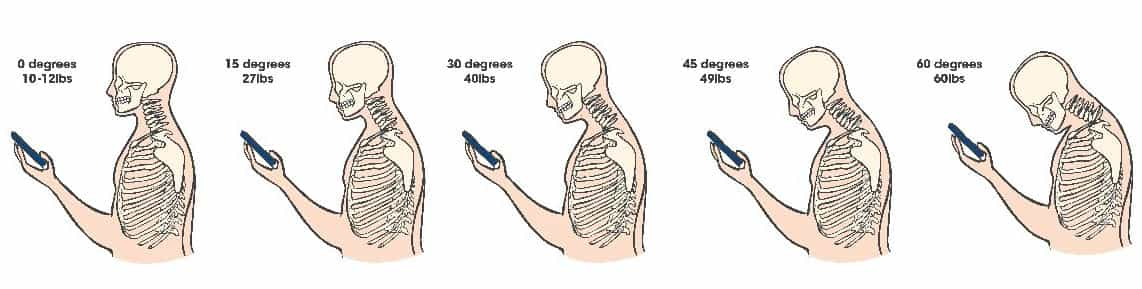
While the invention of cell phones has enhanced our ability to rapidly communicate with each other, looking down at a phone for extended periods of time can accentuate FHP and contribute to the onset of neck pain (Damasceno et al., 2018; Gustafsson et al, 2017).
Spinal surgeons have been reporting an increase in patients who are experiencing upper back and neck pain due to cell phone use (Cuellar & Lanman, 2017). A new diagnosis, known as “text neck”, has been established to describe this condition (Cuellar & Lanman, 2017).
The adult human head weighs approximately 10-12 pounds, however when the neck flexes to enable an individual to look down at a cell phone held in the hand, the relative stress placed on the neck increases significantly higher than just the weight of the head (Hansraj, 2014).
 When the neck is flexed to 15 degrees, the relative stress on the neck can increased to approximately 30 pounds, 30 degrees of neck flexion can increase the relative stress to 40 pounds, 45 degrees can increase the relative stress to 50 pounds, and 60 degrees of neck flexion increases the relative neck stress to 60 pounds (Hansraj, 2014). Using recommended posture when texting on cell phones can help prevent the onset of “text neck.”
MAINTAINING POOR POSTURE WORKING ON THE COMPUTER
Maintaining FHP for extended periods of time when working at your home or office can lead to pain in the CS as well as musculoskeletal symptoms in other body regions such as the shoulders, back, wrist, and hands (Borhany, et al., 2018).
In addition, sitting with abnormal head and neck posture while working on a computer is also associated with higher incidences of headaches (Mingels et al., 2016). Having greater awareness of posture and utilizing a supportive and ergonomic office equipment can help reduce the occurrence of musculoskeletal disorders (Mani, et al., 2016).
USING THE CORRECTIVE EXERCISE CONTINUUM TO IMPROVE FORWARD HEAD POSTURE
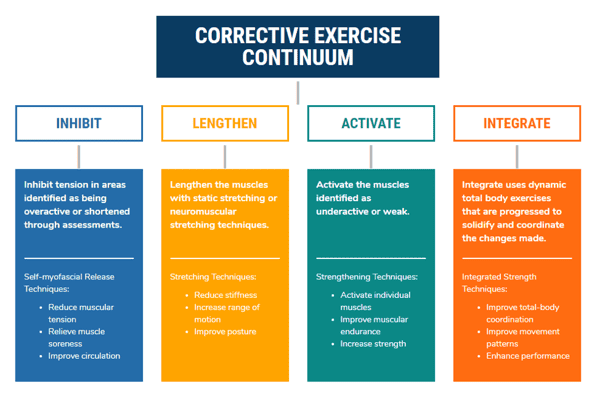 By using corrective exercise techniques to address postural and movement dysfunctions, it can help prevent the negative impacts of FHP. Follow the steps of NASM’s Corrective Exercise Continuum below.
*Important: The specific treatment of pain is well outside a fitness professional’s scope of practice. If your client is experiencing neck pain, it is important that the fitness professional stay within their scope of practice by referring them to a health care professional who is licensed to diagnose and treat their condition, and clear them for participating in fitness programs.
| Compensation | Potential Overactive Muscles | Potential Underactive Muscles | Potential Related Injuries |
| Forward head | ● Sternocleidomastoid (SCM)
● Levator scapulae ● Scalenes ● Upper trapezius ● Suboccipitals |
● Deep cervical flexors
● Cervical erector spinae ● Lower trapezius ● Rhomboids |
● Headaches
● Dizziness ● Lightheadedness ● Shoulder pain ● Trapezius-levator scapulae dysfunction |
STEP 1: INHIBIT OVERACTIVE MUSCLES
Self-myofascial release: Daily, 1 set, Hold tender spots for 30-90 seconds depending on intensity of application.
* Important: There are several areas of the body to avoid using a foam roller for self-myofascial release due to risk of causing pain or potential injury in the structures below the skin.
The CS is a great example of a contraindicated region for foam roller use due to the sensitive nature of this region of the body. To ensure client safety, it is also recommended that the fitness professional address inhibition of the sternocleidomastoid and suboccipitals utilizing the self-applied pressure technique rather than use of instrument-assisted devices.
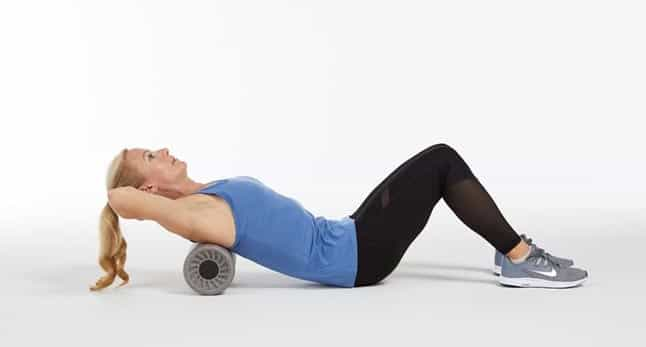
Foam roll the thoracic spine (Do not foam roll the cervical spine)*
Perform instrument-assisted self-myofascial release for the levator scapulae and upper trapezius (Do not foam roll)
Perform self-applied pressure to the SCM and suboccipitals
STEP 2: LENGTHEN SHORTENED MUSCLES


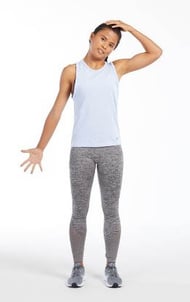
Perform static stretching of shortened muscles: Daily, 1-4 repetitions, 20-30s hold.
STEP 3: ACTIVATE UNDERACTIVE MUSCLES
SUPINE CHIN TUCK AND CURL
The supine chin tuck and curl exercise targets activation of the deep cervical flexors, which are commonly underactive in individuals with forward head posture.
BEGINNER:
Step 1: instruct the client to perform a chin tuck (moving their chin straight back).
Step 2: while maintaining the chin tuck position, instruct the client to contract their deep neck flexor muscles by attempting to lift their head off of the towel roll, however their head should not raise off the towel, rather they are performing an isometric contraction of the deep flexor muscles.
Step 3: NASM recommendations for positional isometric exercises includes 1 set of 4 repetitions holding the isometric contraction for 4 seconds during each repetition with 2 second’s rest between contractions.
INTERMEDIATE
In step 2, client lifts their head 1 inch off towel roll, hold for 2 seconds, then lower head back to towel roll in 4 seconds time. Client performs 3-5 repetitions, with gradual progression to 10 repetitions as strength is gained.
ADVANCED
In step 2, client lifts their head 2-3 inches off towel roll, hold for 2 seconds, then lower head back to towel roll in 4 seconds time. Client performs 3-5 repetitions, with gradual progression to 10 repetitions as strength is gained.
Important: The fitness professional should NOT apply any direct pressure to the client’s head during this exercise.
CHIN TUCK
The chin tuck exercise activates the cervical erector spinae (cervical extensors) which are commonly underactive in individuals with forward head posture.
Step 1: Instruct the client to place two fingertips on their chin.
Step 2: Instruct the client to apply light pressure in the posterior direction with their fingertips to help guide their head posteriorly to tuck their chin (and head) in this same direction moving out of forward head posture.
Following the NASM isolated strengthening cadence, clients will isometrically hold their head in the tucked position for 2 seconds, and then return their head back to the starting position in 4 seconds time. Using NASM recommendations for isolated strengthening exercises, the client can perform 1-2 sets of 10-15 repetitions, 3-5 days per week.
Note: Once the client understands how to perform this exercise correctly, this exercise can be performed without use of fingertips on the chin.
PROGRESSION – CHIN TUCK WITH BAND
After the client has been performing the chin tuck exercise below for at least 2 weeks, a chin tuck with band resistance can be implemented.
The chin tuck with band resistance exercise activates and strengthens the cervical erector spinae (cervical extensors) which are commonly underactive in individuals with forward head posture. Step 1: Provide the client with an exercise band that is 4 to 5 feet in length. (Important. Begin with using a light resistance band and gradually progress to bands of heavier resistance).
Step 2: With the client in a seated position, assist them to place the middle portion of the exercise band around the back of their head while holding on to the ends band with their hands in front of them at eye level. In this starting position, their shoulders and elbows should be flexed at a 90 degree angle (as shown in the image).
Step 3: Instruct the client to perform a chin tuck against the resistance of the band, while at the same time extending their elbows (as shown in the second image).
Following the NASM isolated strengthening cadence, clients will isometrically hold their head in the tucked position against band resistance for 2 seconds, and then return their head back to the starting position, while flexing their elbows back to a 90 degree angle in 4 seconds time. Using NASM recommendations for isolated strengthening exercises, the client can perform 1-2 sets of 10-15 repetitions, 3-5 days per week.
SCAPULA RETRACTION IN PRONE
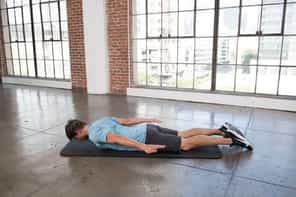
The scapula retraction in prone exercise activates and strengthens the rhomboid muscles which are commonly underactive in individuals with rounded shoulders and forward head posture.
Step 1: Client lies prone, face-down. The client’s arms are relaxed by their side.
Step 2: Instruct the client to “squeeze their shoulder blades together” while also raising their arms approximately 2 to 3 inches off of the floor.
Following the NASM isolated strengthening cadence, clients will isometrically hold this position for 2 seconds, and then slowly return back to the starting position in 4 seconds time. Using NASM recommendations for isolated strengthening exercises, the client can perform 1-2 sets of 10-15 repetitions, 3-5 days per week.
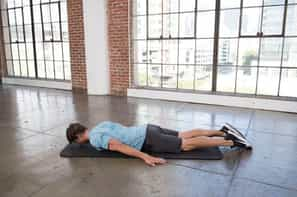
PROGRESSION 1
This first progression of the scapula retraction in prone exercise also activates and strengthens the rhomboid muscles which are commonly underactive in individuals with rounded shoulders and forward head posture. By modifying the arm position, it increases the difficulty of this exercise, as well as activation of the rhomboid musculature.
Step 1: Client lies prone, face-down. The client’s arms are resting on the floor in the following position: shoulders abducted (moved away from their side) to a 90 degree angle, elbows are flexed to a 90 degree angle.
Step 2: Instruct the client to raise their arms approximately 2 to 3 inches off of the floor and “squeeze their shoulder blades together.” Following the NASM isolated strengthening cadence, clients will isometrically hold this position for 2 seconds, and then slowly return back to the starting position in 4 seconds time. Using NASM recommendations for isolated strengthening exercises, the client can perform 1-2 sets of 10-15 repetitions, 3-5 days per week.
PROGRESSION 2
This second progression of the scapula retraction in prone exercise also activates and strengthens the rhomboid muscles which are commonly underactive in individuals with rounded shoulders and forward head posture. By modifying the arm position further away from the body, it substantially increases the difficulty of this exercise to allow for greater activation of the rhomboids.
Step 1: Client lies prone, face-down. The client’s arms are resting on the floor in the following position: shoulders abducted (moved away from their side) to a 90 degree angle, elbows are extended (straight).
Step 2: Instruct the client to raise their arms approximately 2 to 3 inches off of the floor while “squeezing their shoulder blades together.”
Following the NASM isolated strengthening cadence, clients will isometrically hold this position for 2 seconds, and then slowly return back to the starting position in 4 seconds time. Using NASM recommendations for isolated strengthening exercises, the client can perform 1-2 sets of 10-15 repetitions, 3-5 days per week.
STEP 4: INTEGRATE DYNAMIC MOVEMENT PATTERNS
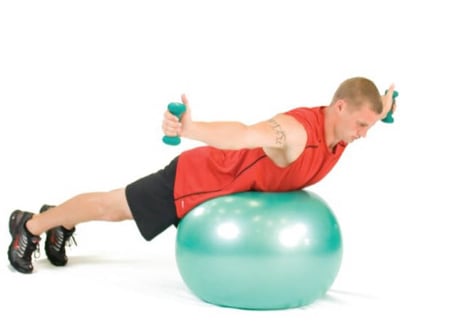
BALL COMBO WITH CHIN TUCK – T POSITION
Step 1: Instruct your client to lie in a plank position on an exercise ball placed under the abdomen. The client’s shoulders are abducted to 90 degrees with elbows extended and hands resting on the floor holding a light weight.
Step 2: Instruct the client to first perform a chin tuck followed by moving their arms up toward the ceiling until they are horizontal to the floor. Between each repetition, the client should relax their head back to neutral position.
Using NASM recommendations for integration exercises, the client can perform 1-3 sets of 10-15 repetitions (using a slow and controlled duration of repetition), 3-5 days per week.
BALL SQUAT TO SCAPTION
Step 1: The client holds light dumbbells in their hands. Instruct the client to descend into a squat using an exercise ball behind the thoracic spine. The client’s arms should remain by their side with elbows extended during the descending phase.
Step 2: Instruct the client to ascend back to the upright standing position while at the same time raising their arms upward in the scapular plane until their arms are parallel with the ground (this plane is located approximately 30-45 degrees anterior to the frontal plane – see photo).
Using NASM recommendations for integration exercises, the client can perform 1-3 sets of 10-15 repetitions (using a slow and controlled duration of repetition), 3-5 days per week.
SQUAT TO ROW
Step 1: The client stands with feet side-by-side, shoulder width apart and places one hand on their hip.
Step 2: The client holds to a cable handle with the opposite hand with shoulder flexed to 90 degrees and elbow extended.
Step 3: The client descends into a squat position.
Step 4: The client returns back to a standing position while at the same time performing one-arm row. After the set, the client repeats the above steps to integrate the opposite side of their body.
Using NASM recommendations for integration exercises, the client can perform 1-3 sets of 10-15 repetitions (using a slow and controlled duration of repetition), 3-5 days per week.
SINGLE-ARM ROW TO ARROW POSITION START AND FINISH
Step 1: Instruct the client to get into a split stance by placing one foot forward and place their hand on their hip.
Step 2: The client holds to a cable handle with their OPPOSITE side hand, shoulder flexed to 90 degrees and elbow extended. (for example, if the left foot is forward, the client uses their right hand to row).
Step 3: The client performs a single-arm row while at the same time rotating their trunk approximately 90 degrees toward the side of their body that is performing the row.
Step 4: The client returns back to step 2 position. After the set, the client repeats the above steps to integrate the opposite side of their body. Using NASM recommendations for integration exercises, the client can perform 1-3 sets of 10-15 repetitions (using a slow and controlled duration of repetition), 3-5 days per week.