
By NASM
Continuing our discussion of the different phases of training from the Optimum Performance Training (OPT) Model, next, we will be covering Phase 2 of the OPT Model titled Strength Endurance Training. This phase acts as a bridge between our focus on stabilization and our new focus on strength. In other words, during Phase 1 Stabilization Endurance Training, we primarily centered on pure stabilization training emphasizing postural control, muscular endurance, joint mobility, and improving coordination and balance.
However, in Phase 2, we also introduce exercises that focus more on strength, while simultaneously integrating stabilization-focused exercises. We also see some new training methods introduced, which we will cover a little bit later. Before discussing Phase 2 in a little more detail, it is essential to understand that as we transition from Phase 1, we are also leaving level one of the OPT model.
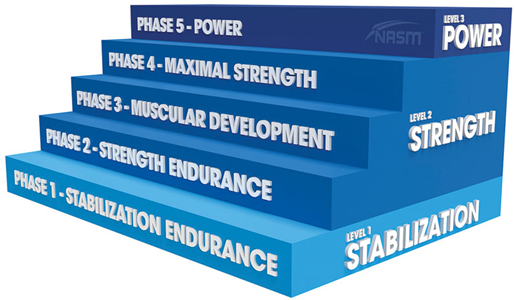
Remember, the OPT model is broken into three different levels with a total of five phases. Phase 1 Stabilization Endurance Training is the only phase within the stabilization level of the OPT model, while Strength Endurance Training is the first phase of the strength level.
As a quick reminder, the three levels of the OPT Model includes stabilization, strength, and power. These are further divided into five phases within the NASM CPT curriculum, which are listed below:
1. Stabilization Endurance Training
2. Strength Endurance Training
3. Muscular Development Training
4. Maximal Strength Training
5. Power Training
To no surprise, the focus of the second level is the adaptation of strength. Strength is commonly defined as “The ability of the neuromuscular system to produce internal tension to overcome an external load”, but when it comes to the OPT model, we are more specifically looking at strength endurance, muscular development, and maximal strength.
Conveniently, these also make up the three phases of the strength level. We will cover Phases 3 and 4 in much more detail in separate articles. But for now, let’s jump into specifics for Phase 2 Strength Endurance Training.
Our primary goal in Phase 2 is to enhance stabilization endurance while at the same time improving the strength of our prime movers. Think of a prime mover as the primary muscle responsible for a movement or exercise. For example, the pectoral muscles are the prime movers during a bench press, whereas the gluteals and quadriceps are prime movers during a squat. To accomplish both of these adaptations simultaneously, we introduce a new method of training referred to as a superset.
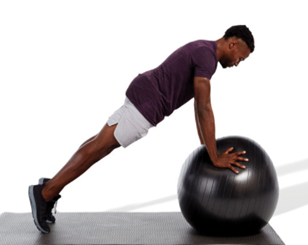
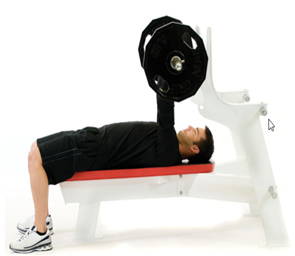
A superset is a sequence of two exercises performed back-to-back with little to no rest in between. When performed within Phase 2 Strength Endurance Training, we combine a strength-focused exercise (performed in a stable environment) with a stabilization-focused exercise (performed in a less stable environment). A great example of this could be a bench press paired with a stability ball push-up. See Table 1 for more examples of supersets used in Phase 2 (this is not an exhaustive list).
Altogether, we can see improvements in strength, muscular endurance, joint stability, and postural control. Typically, an individual can spend anywhere between 2 – 6 weeks within this training phase, but as mentioned in our previous article, progression is entirely based on your client and their capabilities. Never be afraid to progress and regress, as necessary.
DESIGNING A PHASE 2 WORKOUT
When designing a Phase 2 program, we will consider the same training components covered in Phase 1 (these will be the same across all the phases of training).
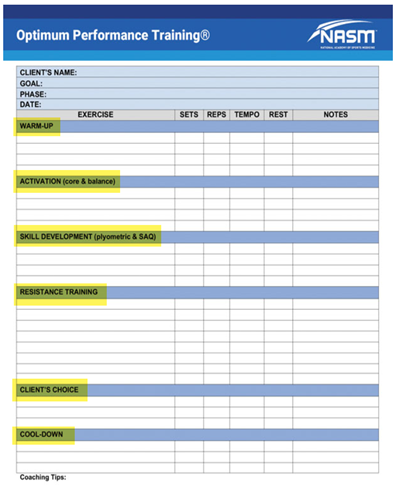
These components include:
• Warm-Up
• Activation
• Skill Development
• Resistance Training
• Client’s Choice
• Cool-Down
Each component is designed and implemented to help elicit a specific physical adaptation. However, you might not always have adequate time to use them all within a single workout.
It will be up to the discretion of you, the fitness professional, to pick and choose which components are most important for your client. With that said, let’s look at a quick breakdown of each and examine how they work within phase 2 of the OPT model.
WARM-UP
You will begin to notice some similarities between all of the phases as we move forward because, at a program design level, many of the characteristics we are using across the different phases are the same. The main difference is variations in acute variables (i.e., sets, repetitions, repetition tempo, and rest periods) and exercise selection, which we will touch on below.
Recall that a Phase 1 warm-up consists of self-myofascial techniques (i.e., foam rolling), static stretching, and optional cardio and dynamic stretching. Within a Phase 2 warm-up, the significant change we will see is a switch to active stretching rather than static stretching. Other than that, we are still going to implement self-myofascial techniques (SMT) and optional dynamic stretching and cardio.
For SMT, the training protocols are the same as in Phase 1; we choose one to three different muscle groups and hold each tender spot for around 30 seconds. From there, we shift into active stretching. For this style of stretching, we are selecting one to three different stretches(remember, this is all based on the fitness assessment results). However, instead of holding each stretch for 30 seconds like in static stretching, we are instead completing 5-10 repetitions. During these repetitions, it is essential for your client to hold each stretch for 1-2 seconds. Active stretching can appear to be the same as static, but there are some significant differences.
The primary purpose of active stretching is to use both agonist and synergist muscles to help move a specific joint into the desired range of motion (ROM) (Vernetta-Santana et al., 2015). This style of stretching helps increase motor neuron excitability which creates reciprocal inhibition of the muscle being stretched (Kenny et al., 2019). Table 2 illustrates how warm-up protocols change from Phase 1 to Phase 2.
Warm-up Protocols
| Phase 1. Stabilization Endurance Training | • Self-myofascial Techniques • Static Stretching^ • Dynamic Stretching (optional) • Cardio (optional) |
| Phase 2. Strength Endurance Training | • Self-myofascial Techniques • Active Stretching* • Dynamic Stretching (optional) • Cardio (optional) |
^Hold static stretches for 30 seconds
*Hold active stretches for 1-2 seconds and repeat for 5-10 repetitions
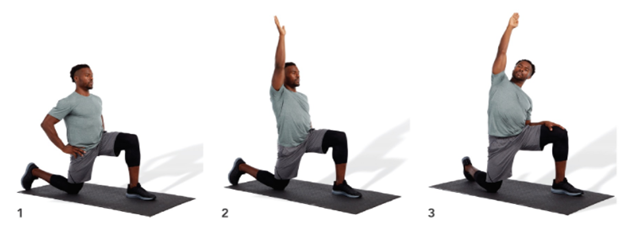
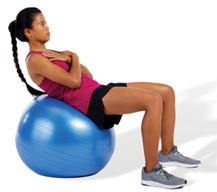
Below, you can see an example of both SMT (SMT for the calf) and an active stretch (Active calf stretch)


Our last components are optional and consist of dynamic stretching and cardiorespiratory exercise. Dynamic stretching is a form of stretching that will be introduced in more detail later on in future posts, but in a nutshell, you are performing movements that take a joint (or joints) through a full range of motion. Moving on to cardio, when completed, this portion of the warm-up is typically between 5 to 10 minutes long.
The goal of this is quite simple; we are looking to increase an individual’s heart rate, respiration rate, tissue temperatures and help prepare the client for higher exercise intensities (McGowan et al., 2015; Silva et al., 2018).
ACTIVATION
The activation component of a Phase 2 program will be a continuation of our warm-up. Think of it this way, in our warm-up; we are applying flexibility techniques to muscles we identified as overactive; now, in activation, we are strengthening underactive muscles. This is the information you should gather during your initial assessment.
Let’s look at the overhead squat assessment (OHSA) as an example. You may identify that your client’s arms fall forward during the OHSA; this could mean the latissimus dorsi are overactive while the lower trapezius is underactive. You would address both of these deficiencies with the appropriate training strategy.
Much like Phase 1 (and the other phases in the strength level), activation in Phase 2 will consist of both core and balance exercises. Core training can help improve performance (Butcher et al., 2007; Dello Iacono et al., 2016; Shinkle et al., 2012), posture (Ko & Kang, 2017; Park et al., 2016), rehabilitation (Coulombe et al., 2017), and help prevent injuries (Huxel Bliven & Anderson, 2013). Just like for core, balance training is a fundamental component of performance, injury prevention, and rehabilitation.
During Phase 2, core and balance exercises should be a progression from Phase 1. This can be accomplished by involving more dynamic eccentric and concentric movements throughout a full range of motion. For example, core exercises will be progressed from little to no movement in the spine in phase 1 into exercises that begin to introduce movements like flexion, extension, and rotation in phase 2.
In addition, balance exercises are progressed in a very similar manner, we start with little to no joint movement in a stable environment and begin to progress into a more unstable environment. We can also increase the repetition tempo; tempo is simply referring to the speed of the repetition. Make sure to choose 1-4 different exercises with a repetition range of 8-12; each exercise can be completed for a total of 2-4 sets. The table below provides examples of how core and balance exercises are progressed from Phase 1 to Phase 2.

Core and Balance Progressions
| Phase 1. Core Training | • Little motion of the spine (isometric stabilization)
• Examples: o Plank |
| Phase 2. Core Training | • Flexion/extension/rotation of the spine
• Examples: o Crunches |
| Phase 1. Balance Training | • Little motion of the stance leg
• Examples o Single-leg Balance |
| Phase 2. Balance Training | • Motion of the stance leg
• Examples o Single-leg Squat |
SKILL DEVELOPMENT
The Skill Development section is an optional portion of the workout, but it can be valuable for many clients and athletes, depending on their goals and fitness level. Within this section, the fitness professional will assign plyometric and SAQ exercises.
Plyometric and SAQ training are effective modes of exercise to improve reaction time, athleticism, aerobic capacity, and can serve as a substitute for traditional steady-state cardiorespiratory exercise, if desired.
Fitness professionals also have the option of foregoing plyometric and SAQ exercises, choosing to substitute specialized instruction for skill acquisition. For example, this portion of the workout can be used to introduce advanced forms of exercise like Olympic weightlifting or martial arts drills. It is important to note, this section is dedicated to the instruction and practice of new skills, not high-intensity work.
Clients new to Olympic weightlifting, for example, can practice with a dowel rod or a similar implement until they learn the basic movement patterns. Clients new to martial arts will be able to practice punching and kicking drills with proper form before using these techniques in a high-intensity fashion later in their programming.
Much like other protocols in Phase 2, when it comes to plyometrics and SAQ, we see a progression from what was completed in Phase 1. For plyometrics, we want to introduce movements involving jumps with more amplitude and dynamic motion.
Unlike Phase 1, where we held each landing for a few seconds to learn proper eccentric deceleration, in Phase 2, we want to progress into more repetitive jumps. Select between 1-4 different exercises and have your clients perform 8-12 repetitions for a total of 2-4 sets. SAQ training is optional, but it can provide a unique and fun training stimulus for your clients. As a progression from Phase 1, SAQ training can include faster movements and greater horizontal inertia.
Choose between 1-4 drills; each drill can be performed for 3-5 repetitions and 2-4 sets. The table below summarizes plyometric and SAQ protocols for Phases 1 and 2 to see easily at a glance how these forms of exercise are progressed.
Plyometric and SQ Progressions
| Phase 1. Plyometric Training | • Small jumps (lower amplitude)
• Hold landing (stabilize) for 3-5 seconds • Examples: o Squat jump with stabilization |
| Phase 2. Plyometric Training | • Jumps with more amplitude and dynamic motion (increased speed)
• Moderate (repeating tempo) • Examples: o Squat jump |
| Phase 1. SAQ Training | • Drills with limited inertia and unpredictability
• Examples: o Cone Shuffles |
| Phase 2. SAQ Training | • Drills allowing greater horizontal inertia but limited unpredictability
• Examples: o 5-10-5 |
RESISTANCE TRAINING
As mentioned previously, think of Phase 2 is as a bridge from stability training to strength training. More specifically, we are looking at the transition from stability-focused training (used in Phase 1) and muscular development/hypertrophy training (used in Phase 3).
Overall, resistance training is very important and can be an excellent tool for increasing lean body mass and reducing body fat (Ciolac & Rodrigues-da-Silva, 2016; Schoenfeld, et al., 2016; Westcott, 2012). This is also the phase where we introduce supersets into our client’s workouts. The goal of the Phase 2 superset is to combine a strength-focused exercise with a stability-based exercise that challenges postural control, stability, and muscular endurance.
In the table below, you’ll find a few examples of what a superset could look like.
| Body Part | Strength-Focused Exercise | Stabilization-focused Exercise |
| Chest | Chest Press Machine Dumbbell Chest Press Incline Bench Press |
Suspension Push-up Single-leg Cable Chest Press Push-ups with Rotation |
| Back | Cable Row Lat Pulldown Bent Over Barbell Row |
Suspension Row Single-leg Lat Pulldown Stability Ball Cobra |
| Shoulders | Seated Shoulder Press Machine Dumbbell Lateral Raise Barbell Overhead Press |
Single-leg Shoulder Press Single-leg Dumbbell Lateral Raise Ball Combo 1 |
| Legs | Romanian Deadlift Lunges Leg Curl Machine |
Single-leg Romanian Deadlift Lunge to Balance Stability Ball Hamstring Curls |
We will begin to see a significant change in the acute variables, and this will become even more evident in the other phases of training. Remember, to elicit optimal performance; it is critical to properly manipulate acute variables, which then helps create structured and systematic programming (Ciolac & Rodrigues-Da-Silva, 2016; Evans, 2019; Mike, et al., 2017; Schoenfeld, el a., 2015; Schoenfeld, et al., 2017; Wilk, et al., 2018). Below, we can see a simple breakdown of the acute variables for the resistance training portion of a Phase 2 program.
| Sets | Repetitions | Rest | Intensity | Tempo |
| 2-4 | 8–12 (strength) 8-12 (stabilization) |
0 – 60 seconds after each superset | 8-12 1RM | Moderate (strength) Slow (stabilization) |
CLIENT’S CHOICE
Like in Phase 1, this section of the workout allows your client to choose one or two of their favorite exercises. At this point, any exercise is permitted as long as you, the fitness professional, deem it safe and effective.
COOL-DOWN
The cool-down is identical across the entire OPT model and should last somewhere between 5-10 minutes. It is very similar to the warm-up, and consists of an optional cardiorespiratory component, SMT, and static stretching. Recall, the use of active stretching will be used for the warm-up during the strength level of the OPT model.
It was mentioned in the Phase 1 article, but it is worth saying again, the cool-down is a critical component of the workout. As a fitness professional, make sure you set aside enough time to allow your client(s) to properly cool-down at the end of each workout. Plus, you can also use this time to go over the workout and any future plans.
ACUTE VARIABLES
At this point, we have talked a lot about the purpose and structure of a Phase 2 program, including acute variables, but when learning about acute variables, a little review goes a long way. Remember, acute variables are the fundamental component when designing any training program, no matter the client or goal. At this point, we have covered both the acute variables for Phases 1 and 2, and shortly, we will cover the remaining three phases.
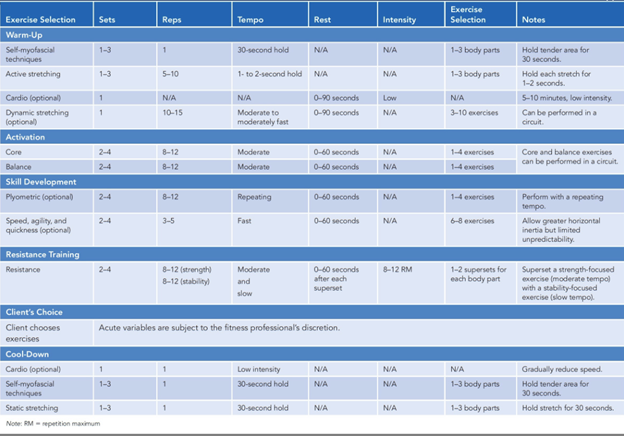
Below, you will find a detailed breakdown of all the acute variables for Phase 2 Strength Endurance Training.
CONCLUSION
We have begun our lengthy discussion of the strength level of the OPT model, starting with Phase 2 Strength Endurance Training. There is always more to cover, but I hope this quick breakdown gives you a good foundation on what to expect during a Phase 2 workout.
I think as you continue working through the material, you’ll begin to see that program design does not have to be a complicated topic and that all different forms of training share similar characteristics. If we can master one style of training, it helps us master the others as well.