
Fitness equipment innovator Fluid X has revealed the growing use, acceptance and success of its…
ACTIVE RECOVERY: REST DAYS, WORKOUTS, AND EXERCISES EXAMPLES
By
Recovery is important for getting the most out of your fitness programming and an essential component of a personal training education. I spend a decent amount of time talking with my clients about proper recovery techniques to avoid burnout and injury due to over-training.
At the same time, my clients are eager to learn what they can do on their off-days to supplement the hard work that they’re putting in at the gym. They want to know: What should I do on my off-days? How much activity is too much? Should I do something active on all of my off-days?
If you’ve ever had some of these questions yourself, active recovery might be the solution that you’ve been looking for.
This article will help you, a personal trainer or fitness enthusiast, understand more about what active recovery is, the science behind it, how to incorporate it into your routine, and some example between-session active recovery workouts that you can try.
WHAT IS ACTIVE RECOVERY?
We all know how our bodies feel the day after a challenging workout. It’s common for exercisers to experience one or more of the following after a tough workout session: delayed onset muscle soreness (DOMS), muscle damage (small microscopic tears that can occur when a muscle is stressed beyond what it’s used to), inflammation, and a feeling of physical fatigue (Dupuy et al. 2018).
When you’re super sore after a workout, it might be tempting to lay down and binge-watch your favorite show to avoid any unnecessary muscle contractions. However, research suggests that doing absolutely nothing might not be the best recovery technique.
THREE WAYS TO APPROACH ACTIVE RECOVERY:
1. Between exercise sets. Example: Cycling at a low intensity between lifting sets or a light jog between a set of sprints.
2. Immediately following a tough exercise session (aka the cool-down).
3. Between exercise days. Example: Performing light cardio or doing a low-intensity movement session like yoga.
BETWEEN EXERCISE SETS:
Not only does active recovery help you achieve physiological homeostasis, but research also suggests that active recovery is superior to passive recovery when it comes to how well you can perform during your workout. The High Altitude Exercise Physiology Program research team from Western State Colorado University conducted a study comparing active recovery and passive recovery when it comes to performance during an exercise session.
The research team discovered that when compared with passive recovery, active recovery has been shown to increase the length of time the athlete could perform without reporting fatigue and help athletes sustain power output (St. Pierre et al., 2018).
We’ve all seen people at the gym sitting on the bench surfing social media between sets of bench presses. Still, this research indicates that it might be more beneficial to find a low-intensity activity like walking a lap around the gym or cycling on a stationary bike between sets to get ready to hit it hard on your next set.
THE COOL-DOWN:
Studies recommend spending about 6-10 minutes after your workout session performing some active recovery for best results (Ortiz et al. 2018). Light cardio exercise, like walking on a treadmill or cycling at a low intensity, can help you get your heart rate down to recover from your workout.
In addition to active recovery, foam rolling is also a great post-workout recovery technique that can reduce DOMS onset (Ozsu, et al., 2018).
BETWEEN EXERCISE DAYS:
Typical active recovery activities include walking, swimming, cycling, jogging, yoga, or active stretching (Ortiz et al. 2018). The key is to find an activity that’s low-intensity and keeps your heart rate at 30-60% of your maximum heart rate. If you don’t track your heart rate or don’t know what your maximum is, you can use the talk-test.
If you can hold a steady conversation while doing the activity, it’s probably the right intensity to be considered active recovery. I don’t recommend trying the talk-test while swimming. There’s not necessarily a recommended length of time for these active recovery sessions, so it might be best to follow general exercise guidelines, which recommend at least 30 minutes of physical activity daily.
One side note about using jogging as an active recovery technique: If you’re a very well-conditioned, competitive runner, then a jog might be active recovery because, for you, a jog is low-intensity and feels relatively easy.
For those who consider running to be an actual workout *raises hand*, a jog might be too intense to be active recovery and might over-tax the system in the long run. Can you keep a steady flow of conversation while jogging? If not, it would be wise to find another activity for active recovery.
Thank you for coming to my TED talk…
ACTIVE RECOVERY SCHEDULE
Now that we understand what active recovery is and how it works, we can get to the fun part: application! When deciding what to do between-sessions, you’ll want to consider your current training program’s intensity level. My favorite way to tackle this is by looking at your training schedule over a week.
Consider how many days a week, you’re lifting weights and the strength sessions’ length and intensity.
The goal is to balance out your week with a healthy mix of medium to high-intensity training with some low-intensity training for recovery. Rhea et al. (2003) recommends spacing out strength training days with 1-2 rest days in-between. Here are a few examples of what your training schedule might look like:
STRENGTH TRAINING TWO DAYS/WEEK:
| Sunday | Active Recovery |
|---|---|
| Monday | Weights |
| Tuesday | Active Recovery |
| Wednesday | Active Recovery |
| Thursday | Weights |
| Friday | Active Recovery |
| Saturday | Active Recovery |
STRENGTH TRAINING THREE DAYS/WEEK:
| Sunday | Active Recovery |
|---|---|
| Monday | Weights |
| Tuesday | Active Recovery |
| Wednesday | Weights |
| Thursday | Active Recovery |
| Friday | Weights |
| Saturday | Active Recovery |
STRENGTH TRAINING FOUR DAYS/WEEK:
| Sunday | Active Recovery |
|---|---|
| Monday | Weights |
| Tuesday | Weights |
| Wednesday | Active Recovery |
| Thursday | Weights |
| Friday | Active Recovery |
| Saturday | Weights |
Your first thought might be, “where are the off-days?”. When done right, active recovery should feel like an off-day compared with your regular training.
When you see active recovery on the schedule, it doesn’t mean that you have to do a structured workout. The key is to do some easy movement to keep your blood flowing.
ACTIVE RECOVERY WORKOUT EXAMPLES
30-minute cardio-based active recovery workout:
You can merely perform this workout by walking out in nature or using a piece of cardio equipment like a bike, rowing machine, elliptical, or even swimming.
Five minutes: Warm-up, start slow, and find your pace.
Twenty minutes: Maintain a steady pace that gets your heart rate up but still allows you to hold an ongoing conversation. If you start to lose your breath, slow down slightly.
5 minutes: Cool-down, slow down your pace gradually until it’s time to stop.
ACTIVE RECOVERY WORKOUT WITH RESISTANCE BANDS
Because most of the population spends extended time in the seated position, I like to recommend active recovery programs that stretch overactive muscle groups and activate underactive muscle groups. Here’s a simple workout that you can try:
FOAM ROLL: CALVES, HIP FLEXORS, AND PECS.
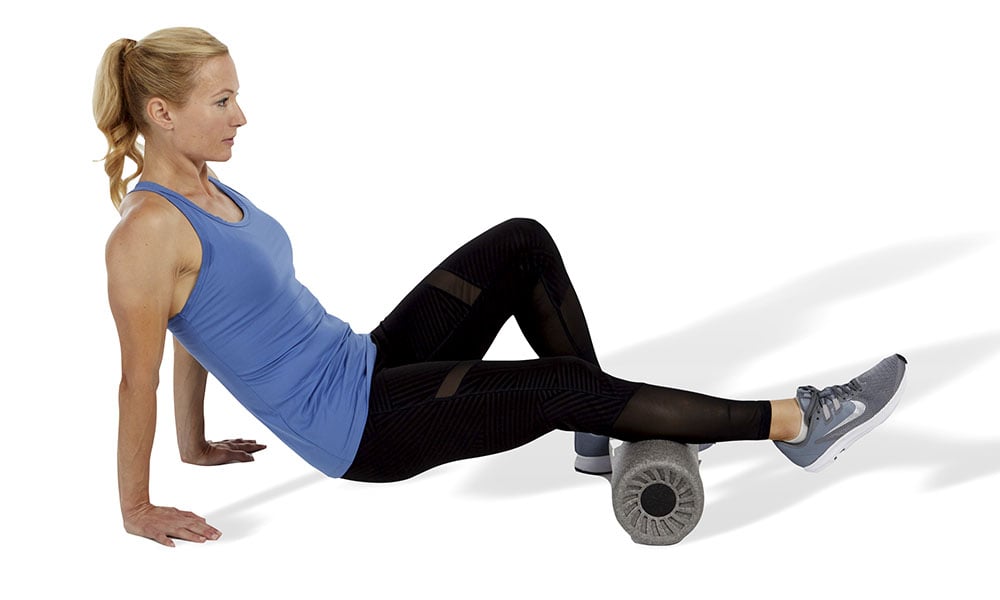
Slowly roll over the entire area until you find the tender spot. On a pain scale of 1-10, this tender spot should be at around a 7- painful but tolerable.
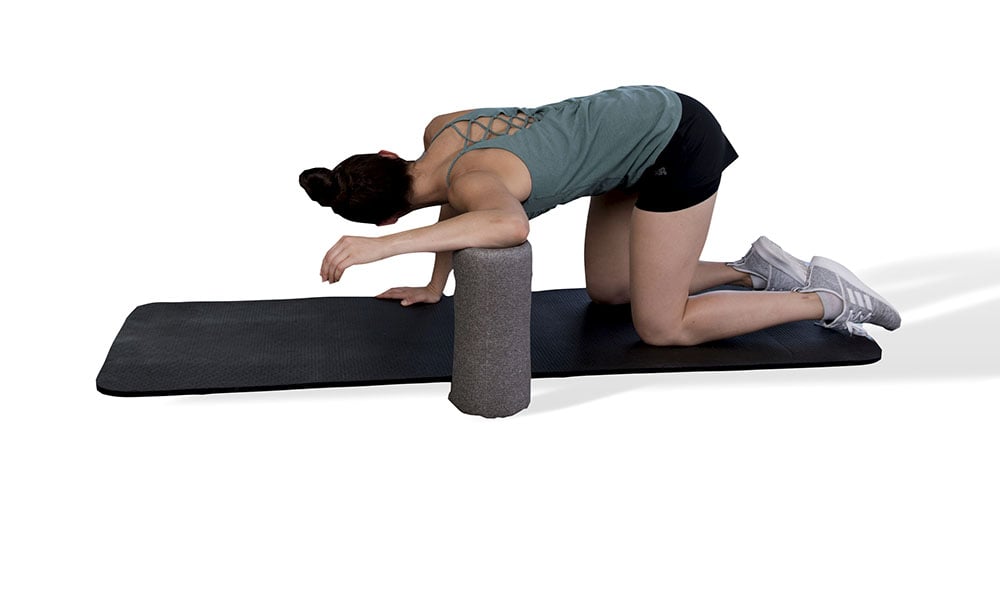
Hold still on this spot for 30 seconds up to 2 minutes. If you feel a heartbeat or numbness or tingling, reposition the foam roller until the sensation disappears.

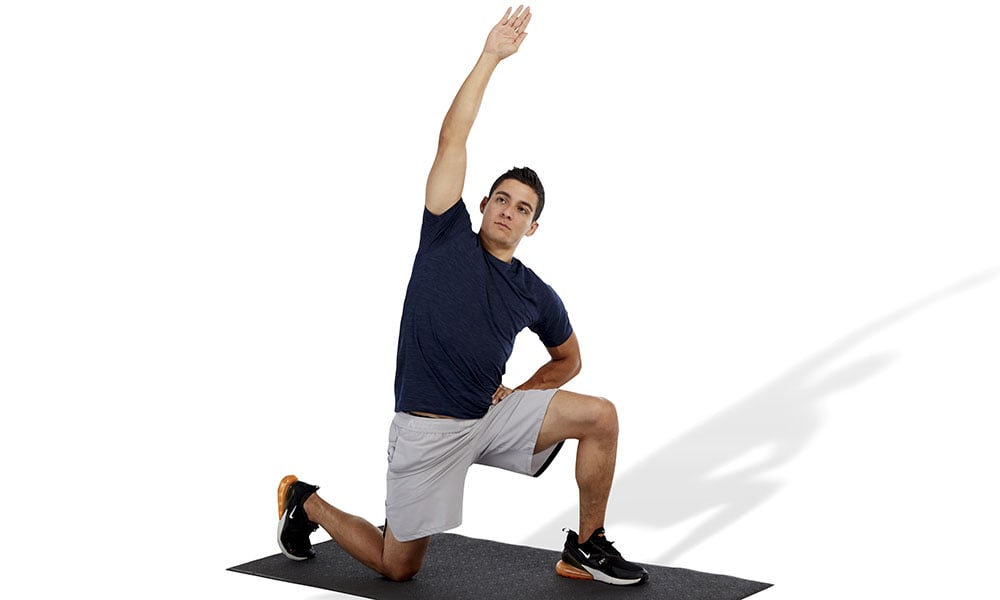
STRETCH: CALVES, HIP FLEXORS, AND PECS.
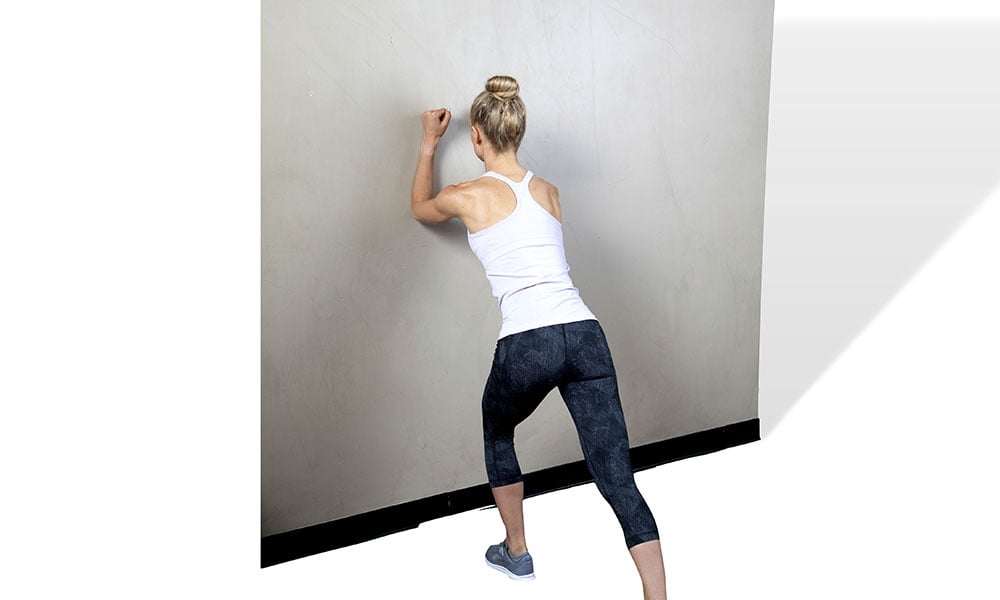
Ease into each stretch position until you feel a comfortable stretch. This shouldn’t be painful. Hold each stretch for 30 seconds to 1 minute.
CIRCUIT: BANDED BRIDGE, LATERAL BAND WALK, EXTERNAL ROTATION, REVERSE FLY.
Perform 12-15 reps of each exercise in a row for 1-3 sets, depending on how much time you have. Perform each exercise at a 4-2-1 tempo (see pictures for description).
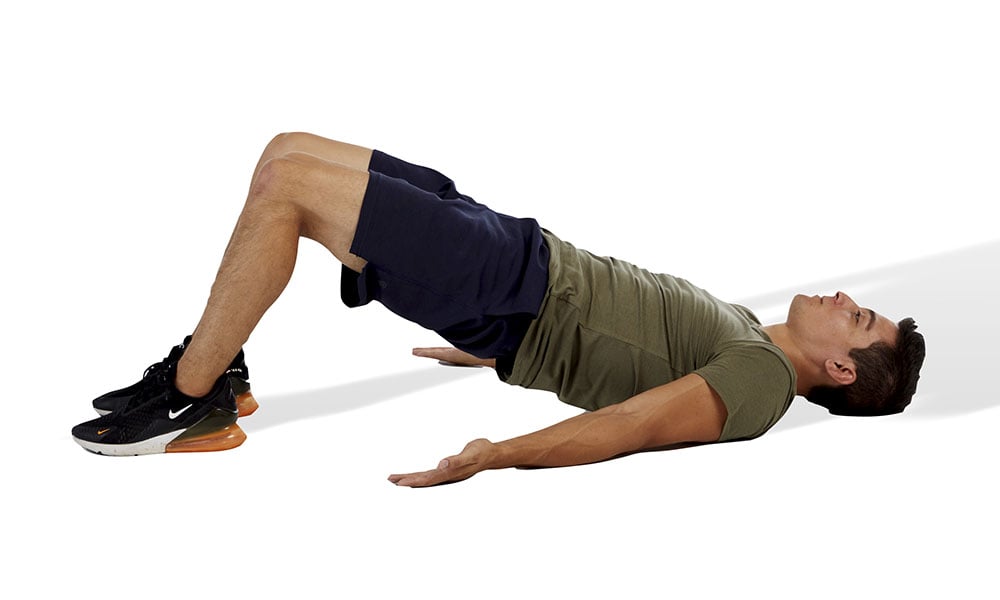
BANDED BRIDGE:
Place the band just above the knees. Lay down on your back with your knees bent and your feet flat on the mat, your arms extended at your side and your palms up. Your feet should be hip-width apart with your toes pointed straight ahead and your heels about 6″ from your rear end.
Keep your feet flat and press through your heels as you squeeze the glutes to raise your hips off the mat. Keep your knees in line with your hips (don’t let the band pull your knees in!) and squeeze your glutes hard at the top of the bridge. Your knees, hips, and shoulders should be in a straight line at the top of your bridge. Hold at the top for 2 seconds and slowly return to the starting position (in about 4 seconds). When your glutes touch the mat, go right back up into the bridge.
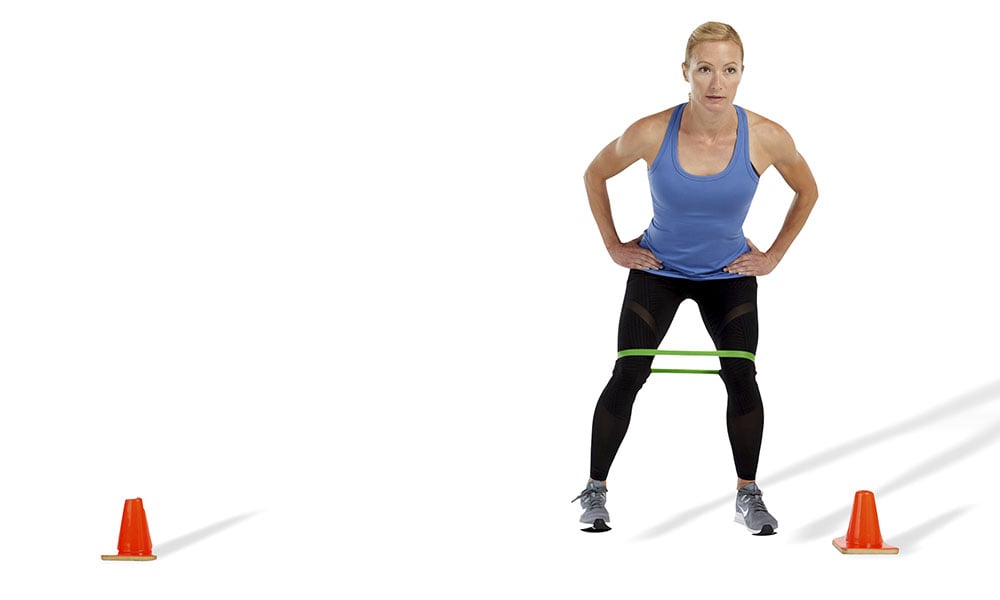
LATERAL BAND WALK:
Place the mini-band just above your knees (or lower for more of a challenge) and stand with your feet hip-width apart, with your toes pointed straight ahead. Keep your knees bent so that you’re in an athletic stance (almost a squat) as you sidestep in one direction with slow and controlled steps.
Keep your core tight so that your upper body does not sway and pick up your feet as you step (no dragging feet!). The goal is to keep your feet at least hip-width apart the entire time to maintain resistance in the band. Take 10-15 steps one way, then 10-15 steps back the other direction.
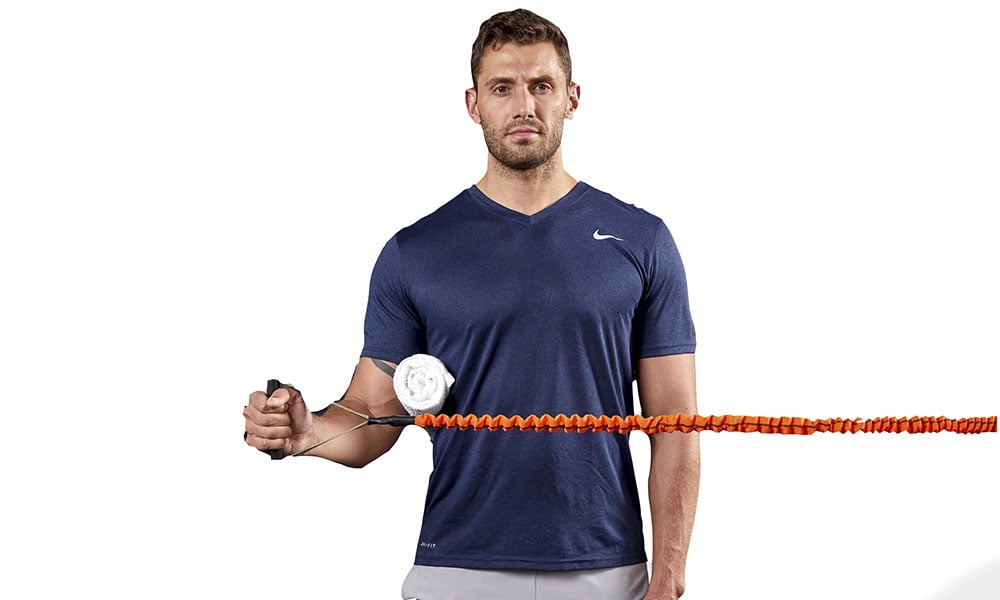
EXTERNAL ROTATION:
Anchor a resistance band to a pole, banister, or in a door (if you have the attachment). Stand tall and tuck your shoulder blades into your back pocket. Pin the elbow of your working arm to your side (it helps to place a small, rolled-up towel underneath your elbow) and pull the band out to your side without flexing your wrist.
Hold that position for 2 seconds, and then slowly return to the start position (taking about 4 seconds to do so). You should feel this in the back of the shoulder. If you feel it in the front of the shoulder, check your alignment and maybe try moving closer to the anchor and try again.
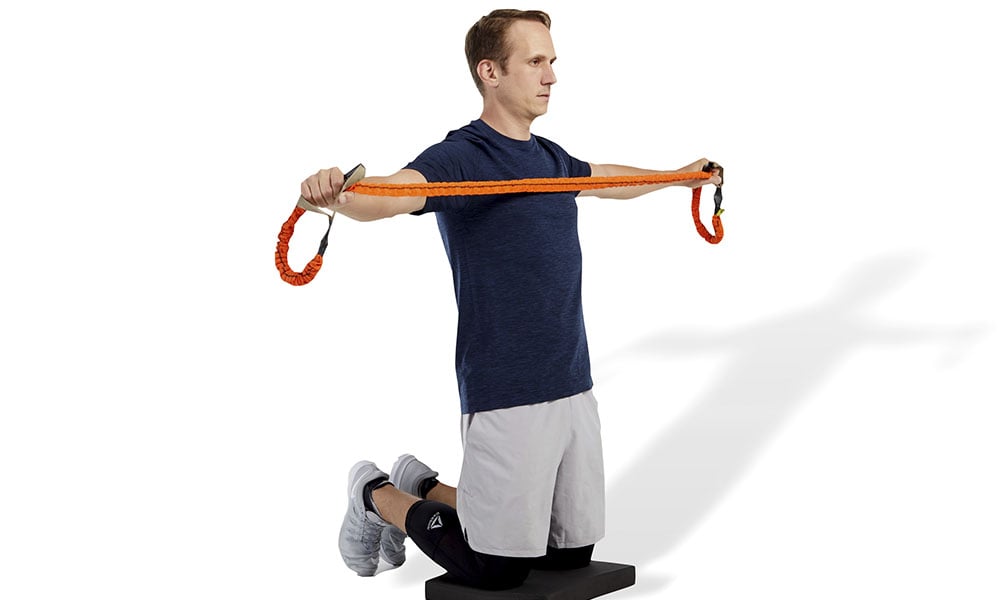
REVERSE FLY:
Hold the band in front of you with your hands shoulder-width apart. The band will stretch as you open your arms out to a “T” position. Squeeze the shoulder blades together and keep your shoulders down. Hold the “T” position for 2 seconds while you squeeze your upper-back muscles and then slowly return to the starting position (taking about 4 seconds to do so).
You can finish the workout by repeating the static stretches you did at the beginning if you’d like!
CHOOSING THE RIGHT ACTIVE RECOVERY METHOD
When deciding what to do for active recovery, we have to remember that the goal is to help our bodies get back to homeostasis. This means that the energy systems that fuel our movement will have returned to normal once we reach homeostasis. Think of your energy systems as a bank account. We all want to see a surplus of funds when we look at our bank account, and we’d like to see this physically as well! Who doesn’t like to have energy and excellent performance during workouts?
Each type of physical activity has some cost associated with it. When we do an intense workout, we make a large withdrawal from that energy bank account and have less to spend afterward. If you make too many consecutive withdrawals from your energy bank, you’ll start to get charged overdraft fees in the form of overtraining symptoms (i.e., interrupted sleep, elevated resting heart rate, overuse injuries, and diminishing performance during workouts, to name a few).
On an off-day, our goal is to add funds back into our energy bank account to make more withdrawals in the future. Adequate sleep, proper nutrition, and time are all necessary ways to replenish those funds. Without those three components, your energy and performance will undoubtedly suffer.
Fortunately, active recovery can also help you get back in the black when applied correctly. One question to ask yourself when selecting your activity on a busy recovery day is, “after completing this workout, will I feel invigorated or exhausted?”. If your answer hedges on tired, worn-out, or exhausted, it’s too intense to be doing on an off-day and would be considered a withdrawal to your energy system bank.
**There are many methods of recovery, as highlighted in a NASM blog post on the subject. Follow the link for more!
HOW TO CHOOSE THE RIGHT RECOVERY ACTIVITY
-Choose an activity that you enjoy. Yoga, swimming, cycling, walking, and stretching are all low-intensity activities, but you can think outside the box and make it fun!
-Monitor your performance to make sure you’re not hitting it too hard on active recovery days. How do you feel when you get back to the gym? Do you feel rested and refreshed or not? Adjust accordingly.
-Consider including foam rolling or getting a massage as part of your recovery routine.
THE GOAL OF ACTIVE RECOVERY
The goal of any recovery technique is to help the body return to homeostasis. Simply stated: after you’ve fully recovered from exercise, you should feel refreshed, no longer sore, and physically ready for the next workout.
Active recovery seeks to accomplish this goal using low-intensity (30-60% maximum heart rate) movement to increase blood flow to simultaneously bring oxygen-rich blood to tissues and remove the cellular waste produced during exercise (Corder et al., 2000; Monedero and Donne 2000).
Think of active recovery as a way to promote delivering nutrients to your muscles so that they can recover and heal at a faster rate than if you were sitting on the couch.
Related Posts


